We’ve written at length about the need to sunset unengaged contacts, categorize the levels of engagement, and really consider the content in your email marketing and marketing automation platforms to maintain good deliverability.
Hitting contacts with emails that continue to go unopened is seen quite poorly in the eyes of most modern email clients, and can end up putting your emails into their spam folder (even if they previously explicitly opted in) and automatically into the spam folders of others or in the most extreme cases not even accepting your email.
In recent years, Gmail especially has been aggressively filtering what they consider spam without considerable warmup and engagement first.
But when it comes down to actually executing on the sunsetting of unengaged contacts, when you’ve got multiple campaigns and flows to create, schedule, and analyze, in addition to the rest of the responsibilities that come with being a Digital Marketer in today’s age – things can be challenging.
There’s a particular rule of thumb we’ve come to understand about lots of digital marketing tasks:
If it’s tedious to do and must be done manually, there’s a high likelihood it won’t get done properly or frequently.
This is especially the case for sunsetting unengaged contacts, especially when there are easy outs like “Well what if they actually open the next email they receive?” or “What if my boss/manager asks why our send volume is going down?”
More often than not, just about every client we work with listens to that voice in the back of their head, to their detriment, and we recommend setting up automation to handle this sunsetting for you.
The Methods of Sunsetting
While many platforms will allow you to do some segmentation to find the unengaged contacts, it’s not always easy to actually automatically sunset them.
In Mailchimp for example (and many, many other platforms), you can pull segments of contacts who are not engaged, but there’s no automation to sunset them within the platform itself, only a manual ‘unsubscribe’ or ability to bulk change a field or tag the contacts. So how can we do it automatically?
Method One: Through the API
API – Three letters that might scare many marketers about having to get developers involved for a silly marketing request. Fortunately, we can quickly outline the steps you need to take to get this done and give a clearly defined set of requirements to your team, a freelance developer, or us here at MH Digital Group 🙂
For an experienced developer, this is not a huge and expensive job to do.
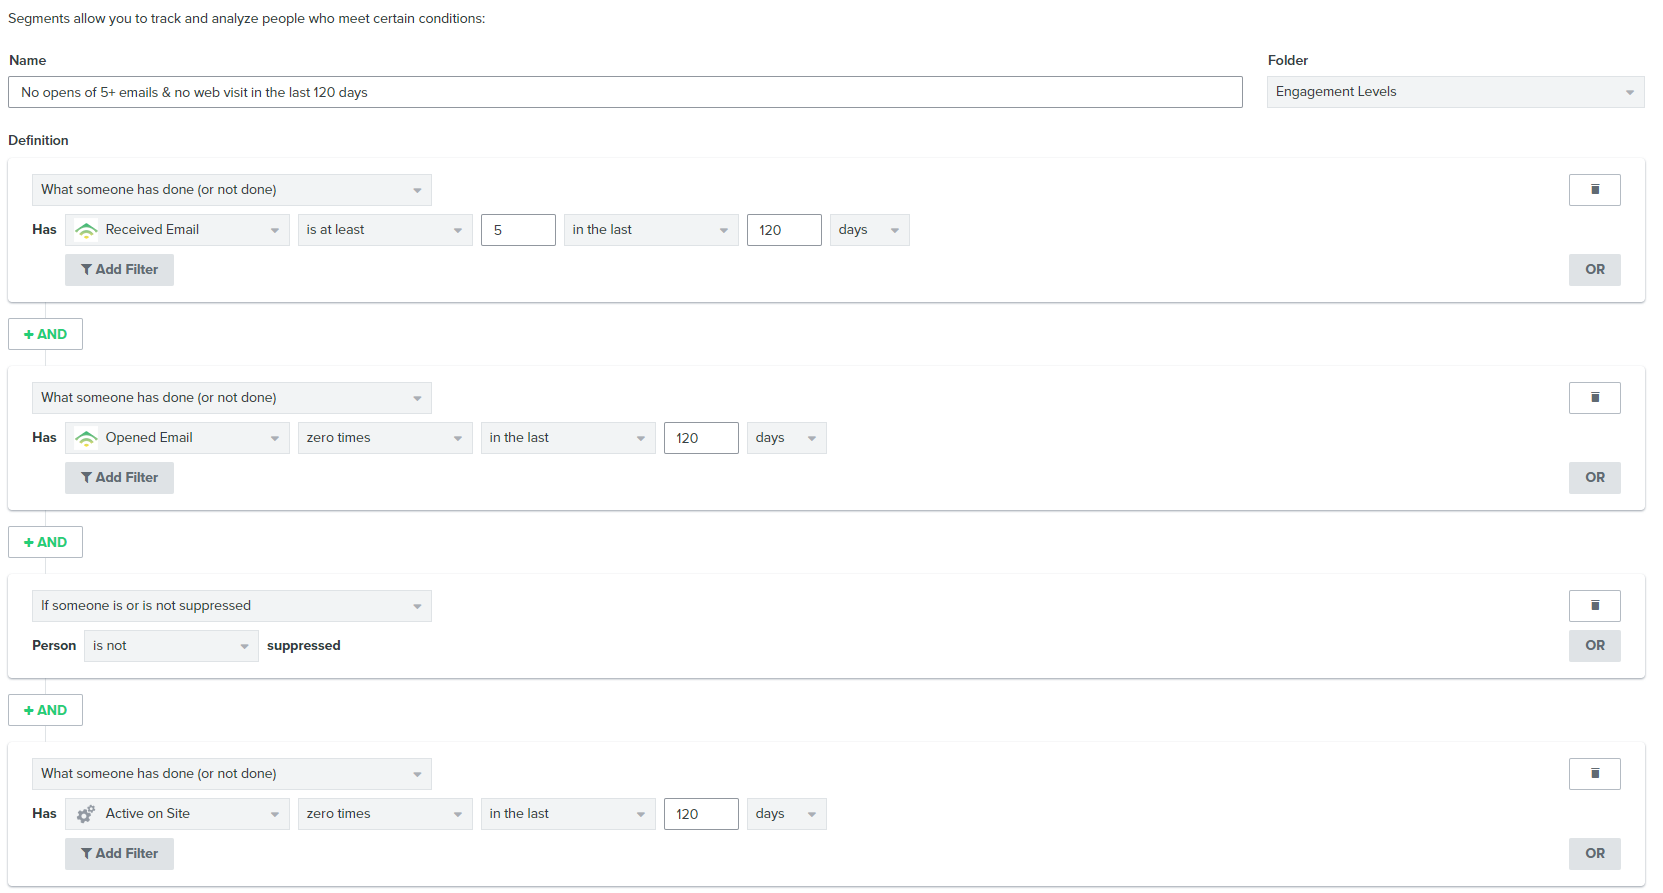
Step One: Create the segment that defines the contacts you want to sunset.
Tip here: Err on the side of caution and make your segment conditions capture the ‘no-brainer’ sunset candidates like ‘Received 10+ emails and did not open any of them‘. When you automate this process, while it is possible to undo, it’s going to require some manual investigating. Measure twice, sunset once.
Another tip, especially for e-commerce businesses: You can use a two pronged unengaged segment approach. Start with a segment of contacts who haven’t been all that engaged and put them in a campaign automation for a ‘Hey friend, are you still interested? Here’s X% off‘ message. If they don’t open that email, then add them to your auto-sunset segment.
Step Two: Define how you want to sunset the contacts.
The simplest method would be to unsubscribe the contact. In this case, you’ll get the added benefit of keep your active subscriber count more limited – which usually means a savings on the account.
Next – consider having another custom field titled something like ‘sunset’ which you set to true whenever the automatic sunset runs.
Why? – In case you need to undo or track how many contacts have been sunset, you need another differentiator, as you may not know which contacts unsubscribe themselves, and which ones get automatically sunset.
Step Three: Take the following to your Developer (or to us):
- The API documentation of the platform you’re working with
- The API code/key required to authenticate an integration with your platform (usually found in the Account > Settings > Integrations area)
- The segment name and segment ID you want to use to trigger the contact sunsetting
- The definition of how you are sunsetting the contacts (unsubscribe, unsubscribe + custom field value, etc)
- How often you want to check for new contacts who should be sunset (once a day is probably fine here)
An Example in Mailchimp:
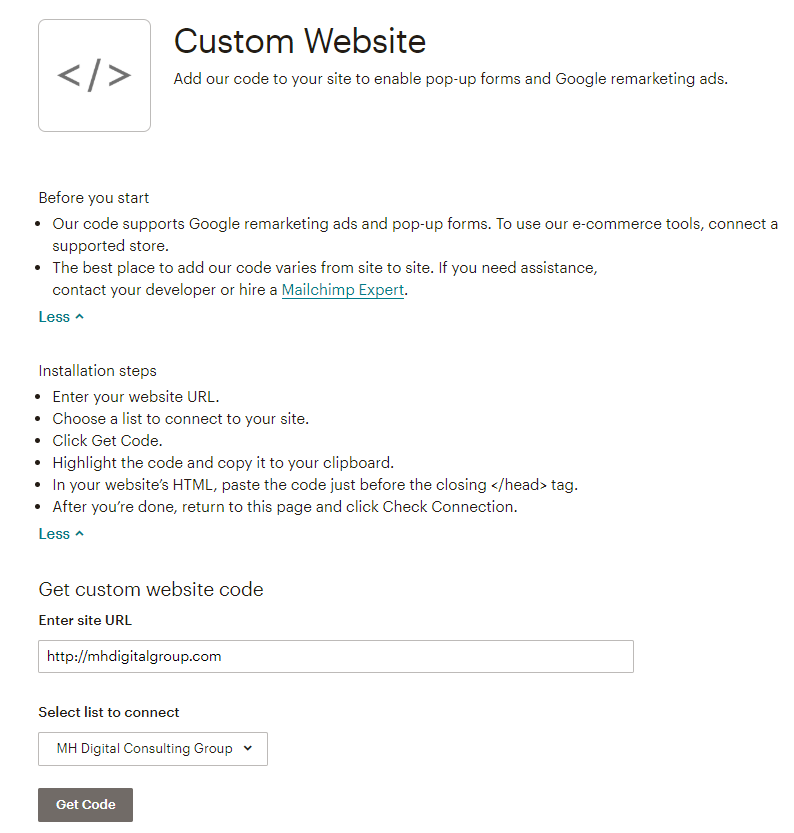
First, you will grab a custom API key (what MC calls a code) from their settings. This grants a developer access to integrate with your account.
Next, we define our Segment:
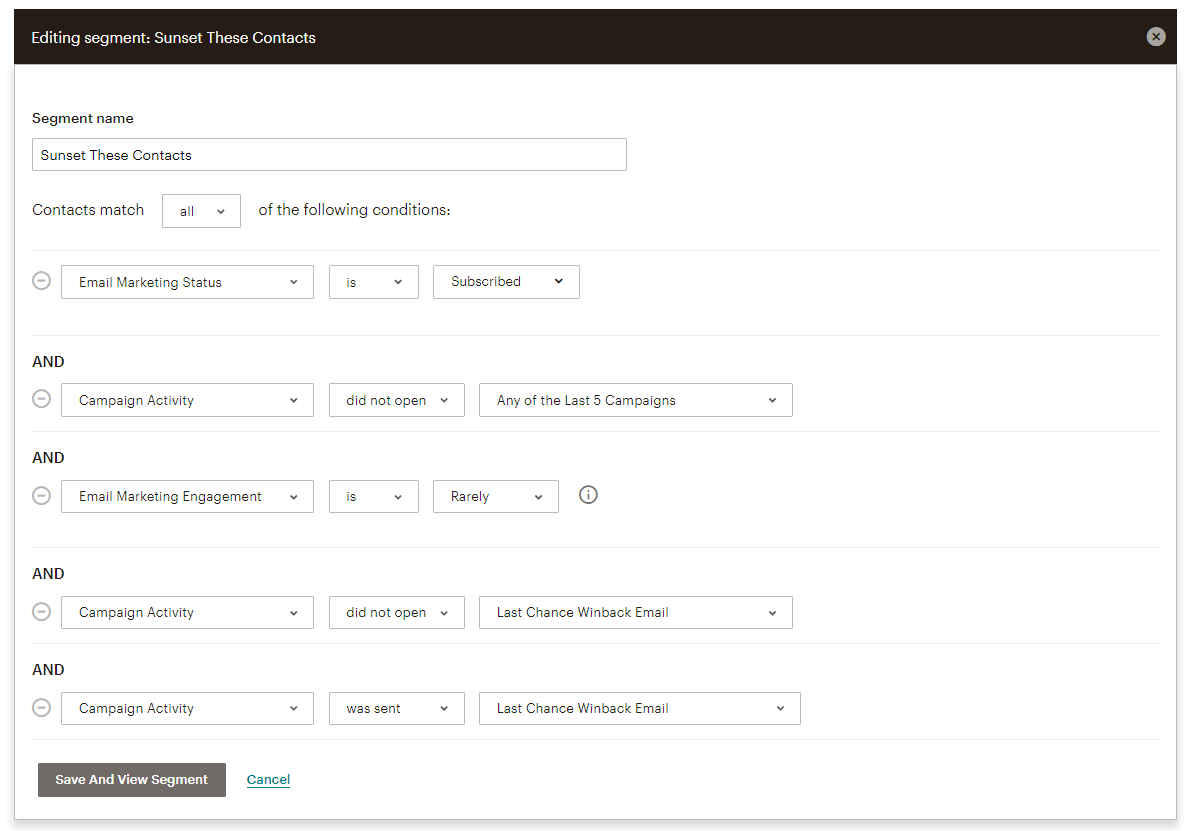
You then go save and view the segment. In doing this, you’ll see an ID=XXXX in the address bar. That’s your segment ID, and your developer will need this to know what segment to trigger off of.
Next, the optional sunset definition. You’ll create a custom field called ‘sunset’ and you’ll tell our developer to set the field to ‘true’ when they’re also unsubscribing the contact during the contact update.
To point your developer in the right direction, you’ll send him the documentation to two specific requests (outside of the ‘Getting Started Guide’ in the API which covers some basic authentication and principles to understand their API):
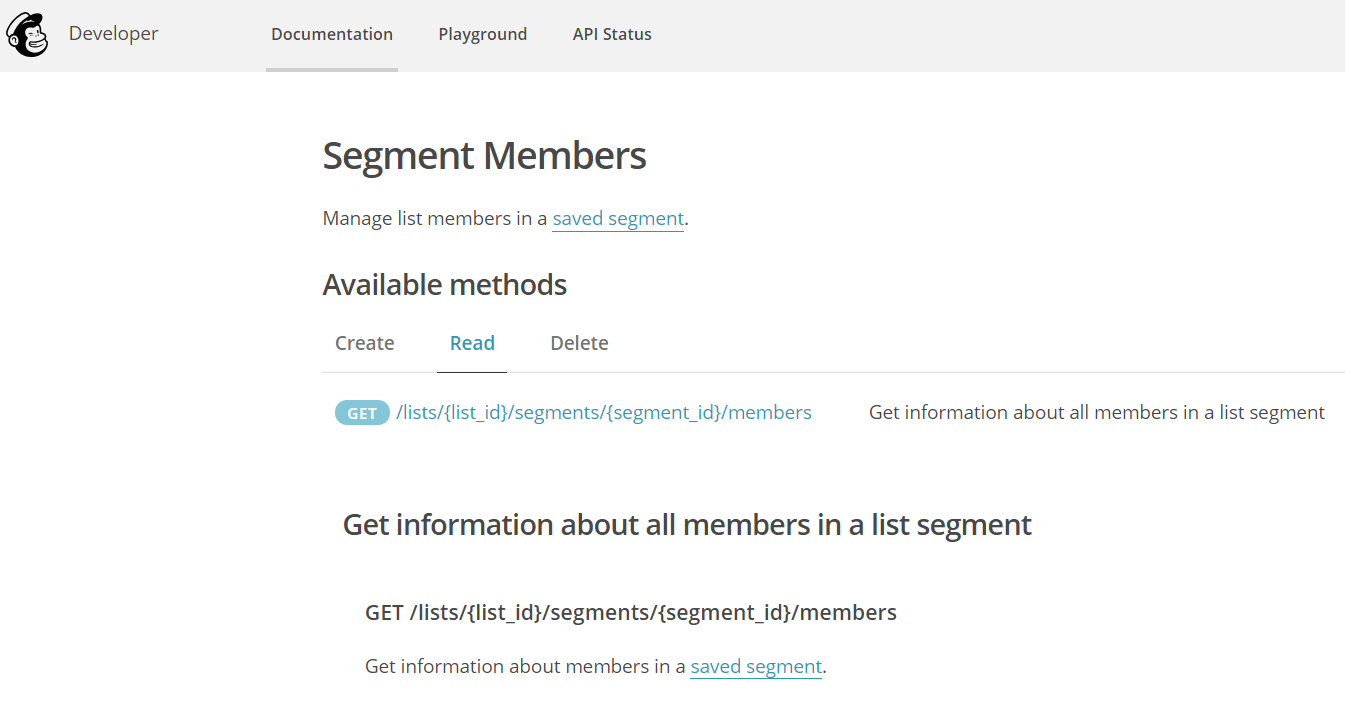
The Segment Members Method – in which you pass the main List ID and Segment ID and which returns the full list of subscribers in that segment.
And the Update List Members Method – In which you can update fields and conditions for a subscriber.
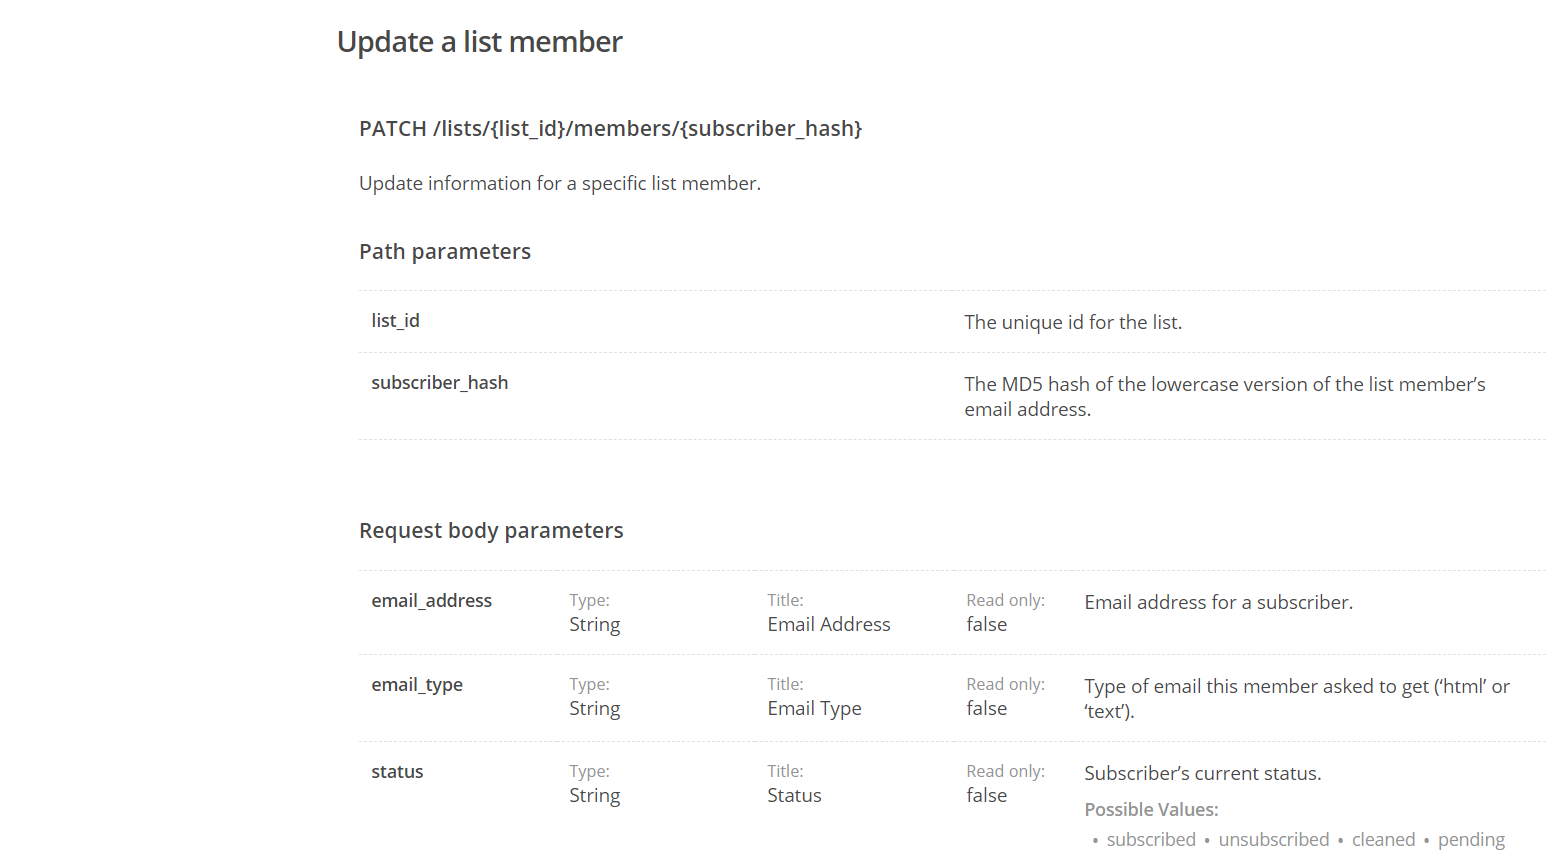
With this information, your developer will take your defined sunset segment and based on your defined frequency to look at the segment, will be able to pull all the contacts that should be sunset. At that point, they can take those contacts and update the sunset field and the ‘status’ field to unsubscribe them.
Voila! – as long as that integration is running, your unengaged contacts will automatically be unsubscribed and flagged accordingly.
Not every email platform will have the same exact API – but the principles will be the same. You just may need to get creative with defining the segment.
Need help implementing this in mailchimp, or building a similar concept in a different tool with less segmentation ability?
Contact us – we’ve done it before.
Method Two: Through a Workflow*
Note the asterisk. Many platforms have the ability to set particular field values or statuses as part of a workflow when segment conditions are met, but they don’t quite get you to a full sunset through an unsubscribe automation. This is the case in Klaviyo and is the case in quite a few other platforms.
Step One: Create the segment that defines the contacts you want to sunset.
Nothing new here – with a bit more automation available in a more robust feature set than mailchimp, that usually means a bit more robust segmentation capability as well.
Step Two: Create the sunset workflow.
Next, you’ll set the workflow up (there’s a winback included in this sunset campaign) triggered on that segment, and then set a custom field parameter (sunset in this case) when the conditions are met that you want to sunset the contact.
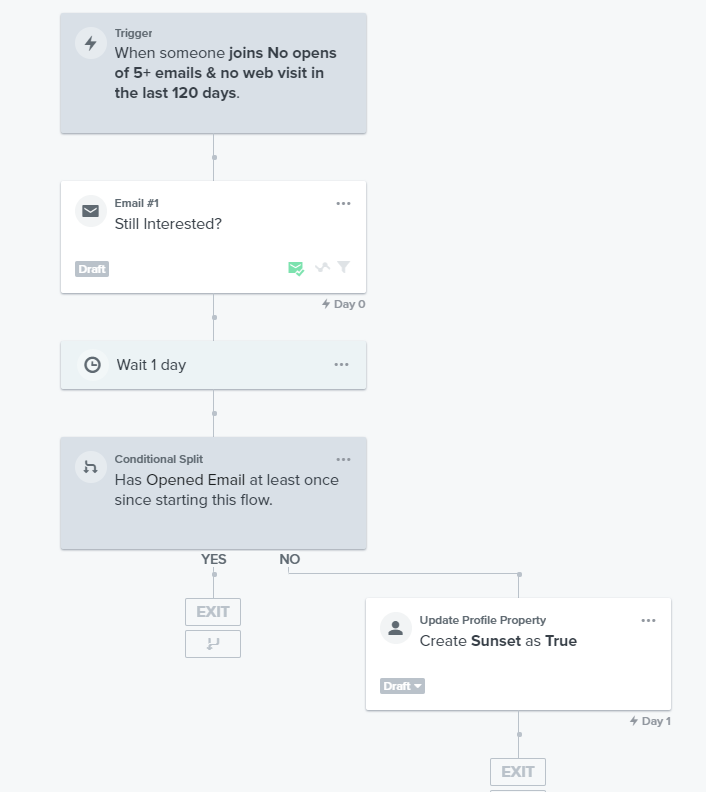
Step Three: Segment future campaigns to exclude ‘sunset = true’ contacts.
Here’s where the automation falls short without a bit of help from a developer and the API. While you can set the sunset field as true, there’s no ability to set the formal unsubscribe field as such.
You can filter all future campaigns to exclude any contact where the field value of ‘sunset’ is true, and while it won’t keep your subscriber count low for you automatically, it will help you in preventing sending future email to contacts who aren’t engaged.
The Optional Step Four: Leverage the API to auto-unsubscribe
Back to the API again. In this case, we’d take a similar approach to what we did in the mailchimp example, but it’s even simpler: Find the contacts who have the ‘sunset’ field set to true, and then actually suppress them.
Method Three: Through Lead Scoring
Fear not, there’s no need to loop a developer on this one!
If you’re familiar with a full marketing automation platform, you know about lead scoring, and it’s ability to add or subtract point values from a contact or leads overall lead score. Lead scoring is great to trigger actions when a prospect, lead, MQL, or SQL is primed for the next phase, but it’s also an absolutely fantastic method of tracking email engagement.
Why? Because most regular segment capabilities don’t quite capture the full story. Some examples:
A segment like “Did Receive an email and did not open it” doesn’t tell the full story. Did they only receive one email that they didn’t open? Or did they receive 20 emails and didn’t open any of them?
Even segments like “Did receive the last 5 emails and did not open” don’t tell the full story. What if they’d engaged with tons of emails prior to the last 5, but were on a trip somewhere with limited email access during a busy email sending week for you?
Further, how do you answer what’s better for you? Someone who opened two emails but didn’t click any CTAs, or someone who opened just one email and did click the CTA?
While edge cases, these situations add up. But Lead Scoring can take of it better than any segment condition can on it’s own.
How it works:
To create your email engagement sunsetting model, you’ll operate using the following principles: When someone receives an email yo’ll deduct a point from their overall lead score, when they open an email, you’ll add points, and when they click within that email, you’ll add even more points.
If someone reaches a particular negative point value threshold, you’ll use that to trigger the sunsetting action. Because each email subtracts points, the only way they won’t reach the threshold is if they engage with your emails, and they get extra points for actually clicking through to your content.
This approach works really well because a brand new contact who hasn’t opened the first email can’t reach that threshold, and it is constantly evaluating contacts who have been in the database for years to track their overall engagement, without too much recency bias.
In our example, we’ll use Net-Results Marketing Automation‘s lead scoring overlay system, which is great in this case because they allow multiple overlays, meaning you can still run your standard lead scoring efforts while simultaneously running a separate system to track this email engagement.
Shout out to Mer and AJ at Net-Results for collaborating on this approach with me.
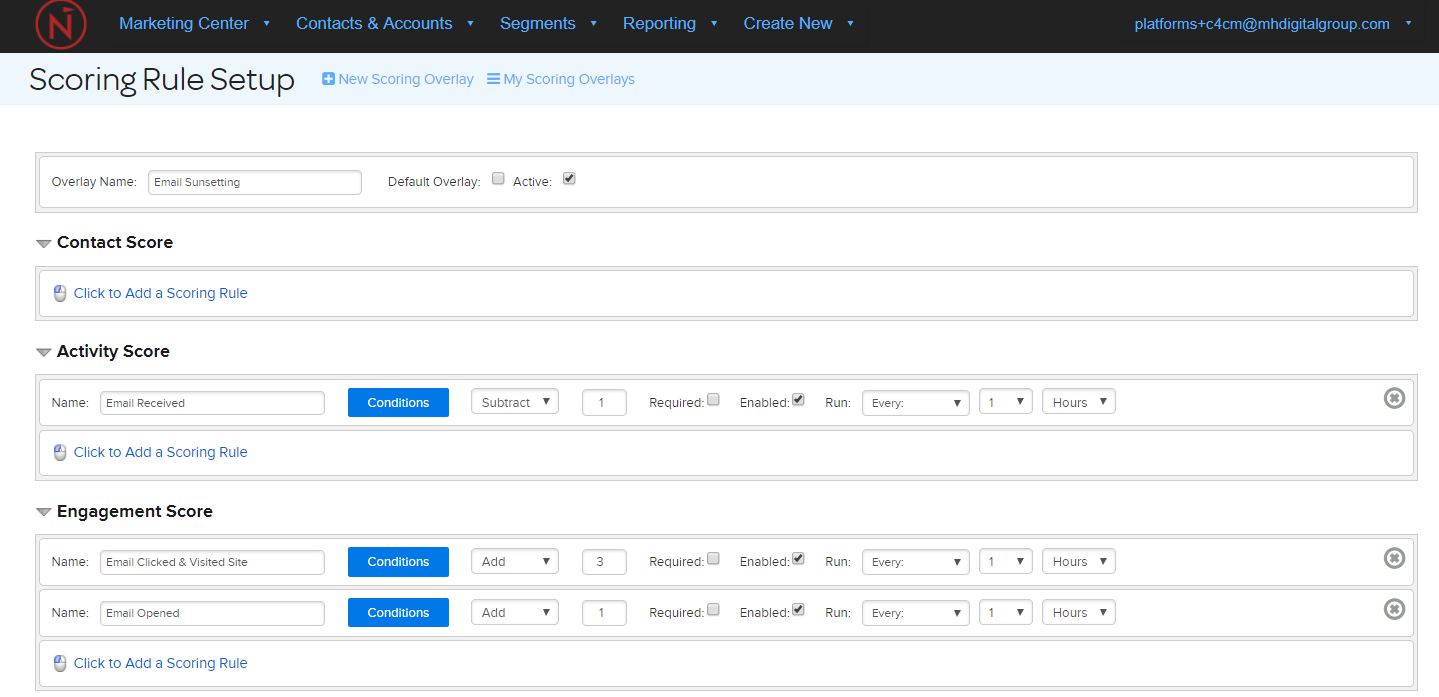
Step One: Defining the lead scoring conditions.
In this case (and it can be different depending on your current state of deliverability and how valuable an individual email contact is to you), you’d set the scoring rules as follows:
Subtract 1 point for an email sent to a contact
Add 1 points for an email opened by a contact
Add 3 points for a click and visit from an email by a contact
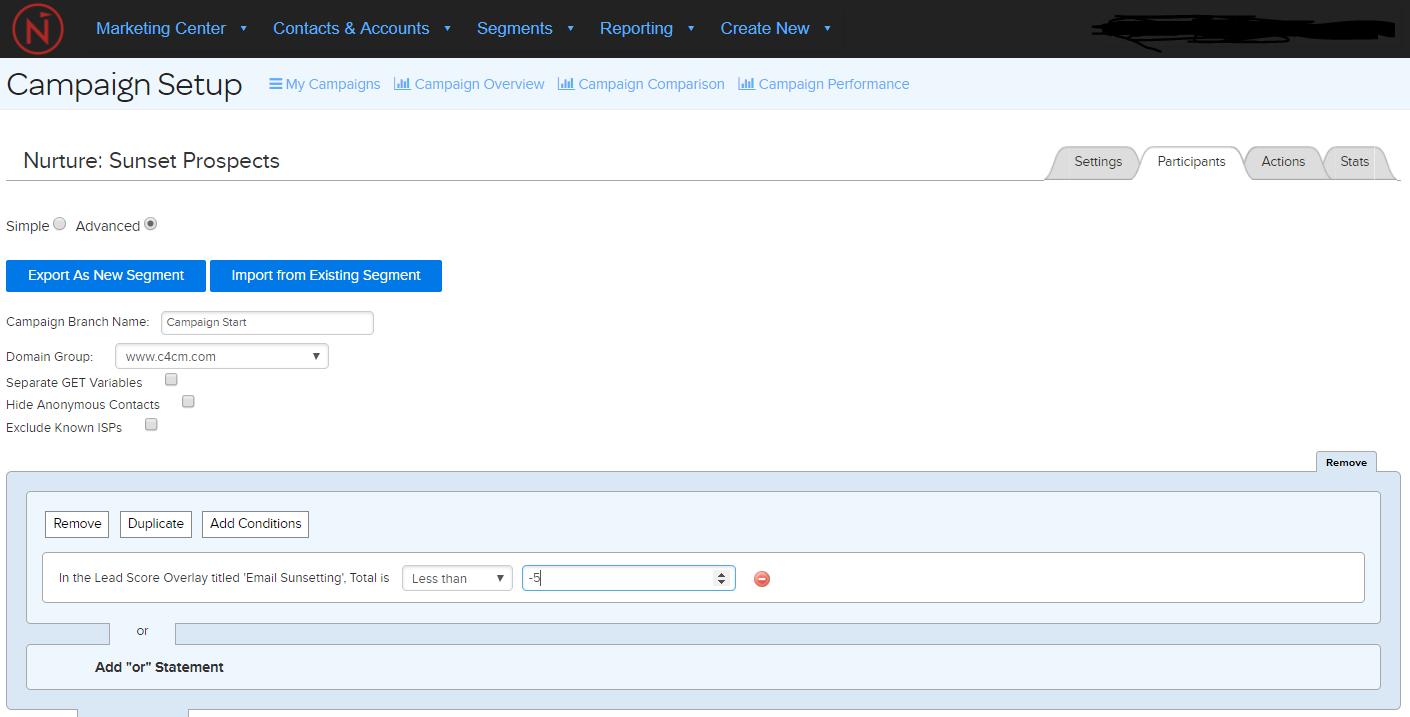
Step Two: Defining the sunsetting trigger score
Next, you need to define the threshold at which we want to trigger the sunsetting actions. As done in the previous example, we’ll start conservatively at something like -6. This would require a brand new contact to have received 6 emails and have not opened any of them for them to be eligible for sunsetting.
In Net-Results, you handle this through a perpetual workflow.
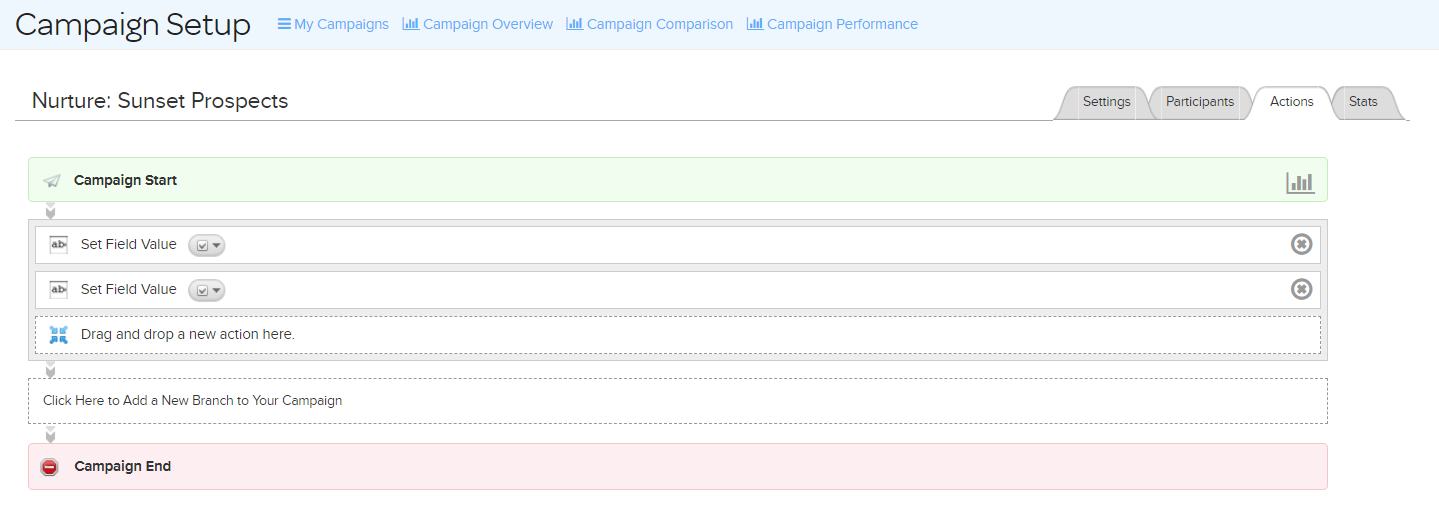
Step Three: Set the actions and launch the workflow
Much like we covered in the very first example, you will set the unsubscribe status of the contact to ‘true’ and also set a custom field value of ‘sunset’ to ‘true’ so that you know this contact was unsubscribed by this process, and that they didn’t necessarily unsubscribe themselves.
Step Four: Monitor and adjust the conditions over time.
If you know lead scoring, you know that it takes some tweaking to get right. The same goes for the automatic sunsetting, so keep an eye on what’s happening early on and don’t be afriad to get more aggressive in your sunsetting conditions.
Wrap Up
While some of these methods are easier than others to implement, all three are valid and are valuable to your email deliverability (and your platform costs). With just a bit of early investment, you’ll save yourself a headache of deliverability hell down the road, and know that you’re following modern email marketing practices.
Need help implementing this in your ESP or Marketing Automation Platform?
Let’s chat.